May 20, 2008 at 12:10 am
· Filed under Coursework, Physical Computing
As my final project for Physical Computing, I created a simple Flash game that uses the Nintendo Wiimote (four of them, actually) as an input device. The screen shows a grid of squares. Each Wiimote is associated with a color, and players point and press buttons to flip the squares to their individual colors. Whichever player has the most squares of his color at the end of the game wins.
It was interesting to work on this project because of the multi-user aspects. Handles for the different user actions needed to be abstracted so as to be associated with different users. I also created two sets of handles so I could choose between Wiimote and mouse control when debugging – rather than having to hook up the Wiimote every time – and for systems at school where I don’t have privileges to install a bluetooth stack willy-nilly.
This project also served as a testbed for future interactions. Working with the Wiimote as a user input device for the RIT Collaboritorium project is more pheasible now. I created a set of four different IR beacons to be centered underneath each screen of the DOME. The IR beacons serve as anchors so the Wiimote knows which way it is pointing, and also (because each one is different) at which screen it is pointing. The pointing gesture is not literal, but suffices enough to trick the user into being happy.
Single-Player Mouseable Tile Game
Read the rest of this entry »
Permalink
May 19, 2008 at 11:39 pm
· Filed under Coursework, Physical Computing
Another project was a brief excursion into the world of electric motors. In this particular (short!) project, we were tasked with creating something simple with a motor, stepper, or servo.
I had originally wanted to do something through Flash with the servo, but found that to be too difficult for the scope of the project. The main reason for this is that Flash is rather atrocious when it comes to controlling time precisely. The PWM calls to the servo motor required mili- and micro-second accuracy, something Flash just doesn’t have.
As a substitute, I scaled things back to just using that cute volume slider from the Blink project to control the rotation of the servo: all the way left, all the way right, and everywhere in between.
Motor Code Read the rest of this entry »
Permalink
May 19, 2008 at 11:19 pm
· Filed under Coursework, Physical Computing
It’s only been, what, 9 weeks since I finished the Blink project for Physical computing? *sighs* I didn’t do myself any favors this Spring quarter at RIT. Seriously.
Anyway, as a “Hello, world!” with the Arduino, our task was to modify the basic LED Blink program to do something somewhat more interesting. For mine, I used the volume slider from an old walkman, and a bend sensor to modify the blinking pattern of a series of LEDs. The volume slider controlled how many LEDs were lit, and the bend sensor affected how quickly the blink occurred.
(could’ve sworn that image was around here somewheres…)
Blink Code Read the rest of this entry »
Permalink
April 11, 2008 at 5:00 pm
· Filed under Physical Computing
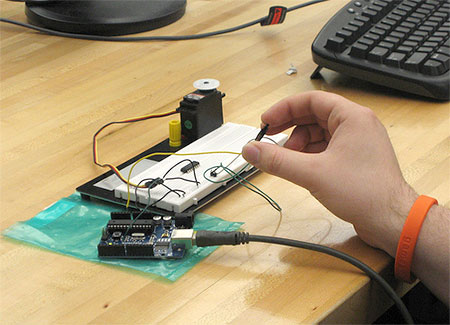
James Alexander and I worked together on “Bullrider” for our Physical Computing class. Our assignment was called “Project Runway.” Our task was to create a wearable project that had integrated sensors.
Jim had an inflatable bull riding costume from a previous Halloween party that was perfect for this project. We placed an Arduino in the hat, which took readings from an accelerometer. We also attached terminals to a grip-strengthener exercise thingamajig that would sense when it was held closed, and topped that piece of hardware off with a reset pushbutton.
The goal was to simulate a bull ride for the user wearing the costume. To begin the ‘game’ they close the grip-strengthener (simulating a tight hold on the rope) and keep it closed. On screen, there are two fields above and below a graphic representation of the bull. When the user jumps, it moves the graphic of the bull up and down accordingly. The fields gradually move apart, and the user must jump higher and higher to touch both of them. If the user fails to maintain a steady grip, or fails to touch the fields at a certain interview, he has fallen off the bull.
Below I’ve included the on-screen portion of this project. It differs only by means of user input. Instead of holding the grip-strengthener, the user must press the spacebar. Instead of jumping, the user must move the mouse up and down repeatedly.
Keep an eye out for photo and video of the actual project, as well as the link to a case study!
Bull Rider
Permalink
April 8, 2008 at 6:23 pm
· Filed under Innovation and Invention, Musings, Physical Computing
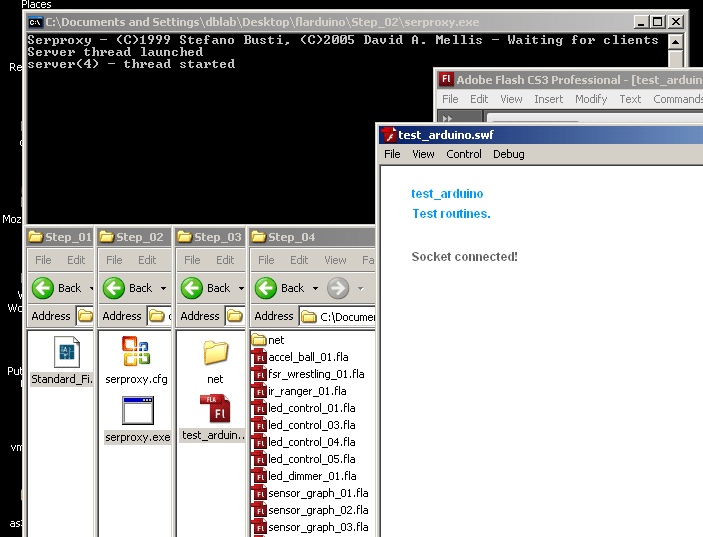
It took some doing, but we got the Arduino to talk to Flash CS3 in a neat way. I’ve compiled that information here because I think it is useful and not explained well anywhere else.
First, you need to get Standard_Firmata.pde onto your Arduino. This is done just like any other Arduino sketch. Firmata provides the framework necessary to have read/write access the ports of the Arduino over the Serial connection. You can use any number of different programming languages to talk to the Arduino board without having to upload a different program to the board’s memory. Firmata rocks!
Second, (at least for Flash) you need to have a Serial Proxy running in the background. SerProxy functions as go-between for Arduino and Flash. Arduino speaks Serial messages, Flash speaks Socket Connection messages, and SerProxy acts as the bi-directional translator. SerProxy rocks!
Third, you need a Socket Connection in Flash. AS3Glue is a library of AS3 classes designed with this in mind, and includes built-in methods, properties and events for communicating with Arduino over the Socket-to-Serial path. The people over at protolab have adopted AS3Glue for their work, and have made a bunch of neat .fla files using the library.
At the end of this post, I’ve provided a screen shot of the base setup working, as well as a zip archive of the software you need to get started. It includes a quick readme to get you up to speed! Enjoy!
 Flarduino Archive
Permalink
March 13, 2008 at 9:20 pm
· Filed under Physical Computing
The last time I seriously messed with anything electrical was my 10th grade “Project Lead the Way” course in Digital Electronics. Coincidentally enough, the course was accredited through RIT – college credit for high school work is not too shabby at all.
Glossing over Ohm’s Law in class brought back some happy memories, as did breadboards and multi-meters, circuit diagrams and wire strippers, LEDs and resistors. *sigh* Those were the days… we’ll see how much I actually remember.
What was it? Bad beer rots our young guts but vodka goes well? Black, Brown, Red, Orange, Yellow, Green, Blue, Violet, Grey, White!
Ha! I still got it. 
Permalink
February 29, 2008 at 7:21 pm
· Filed under Virtual Entertainment
Well, the quarter’s over. What do we have to show for ourselves?
Final critique went amazingly well. I’m fairly certain we impressed a great deal of our classmates with the Asteroids3D project. In addition to that deliverable, we’ve added a case study to highlight the major parts of our project.
Illustrations coming someday.
Permalink
January 9, 2008 at 12:18 pm
· Filed under Virtual Entertainment

I took the first one million digits of Pi, and pulled ten random colors from a photograph to show numbers zero through nine.
Every square was assigned a different number from the first one million digits of Pi, and colored with the color assigned to that number.
Each square then progresses to the next color at its own rate, making a twinkling animation. Click the image above to go see the animation!
Permalink
December 6, 2007 at 3:33 pm
· Filed under Virtual Entertainment
I could watch this all day. Actually, for almost 3 days.
Pi3D: Version 1 (give it a moment or several)
I loaded a text file containing the first million decimals of pi into proce55ing. I then created about 180 PiPoint objects to keep track of waveform values. I have an offset counter that keeps track of what point we’re on, and each PiPoint is smart enough to find out its y-value based on the offset counter and its distance from the front of the ribbon.
In actuality, the ribbon stays in place, while the values of pi tween through it. When the points change direction it means they’ve reached a whole decimal. The slope in between represents the difference between consecutive numerals. For example, if you take 3.14, the difference between 1 and 4 is three. So if you start at a ribbon value of 1 (the 1 in 3.14) and travel 1/3 of the distance between the 1 and the 4, you’ll arrive at a ribbon value of 2. Likewise, 2/3 of the distance gets you to 3, and 3/3 (all the distance) gets you all the way to 4.
A displacement of n in the offset counter is the same as no displacement but starting pi at 10*pi*n. It’s really not mathematically significant at all, but it looks pretty cool.
Permalink
December 5, 2007 at 10:57 am
· Filed under Virtual Entertainment
Tried my hand at Processing. Interesting stuff. Just playing around to find out what the capabilities are. Here are some links:
Moving dots: Dots
3D Cube: Cube (takes a little while)
Permalink